Tuesday, August 27, 2013

Close the Door–Part Deux

Yeah, I know it took me a long time to get this update posted but I been busy…..

The real issue is to keep the door from “breathing” as we go down the road.  Any give in the bands that hold the doors closed allow it to pump cold air out and room air into the freezer and refrigerator areas.

Fortunately, I found a surprising solution.  Figure 9 binders:

PhotoPhotoPhotoPhoto


I found these at Harbor Freight and they make a quick and secure way to cinch down cargo, or bind objects together with very little movement of the individual parts.  They do come in different sizes, too.

http://www.harborfreight.com/catalogsearch/result?q=figure+9

I just used the same clamps that I showed in the previous post which the bungee cords were hooked into.  At the hinge side I just made a simple turn around the hinge brackets and looped that end up to the Figure 9 device.

ttfn

Budd

Monday, August 1, 2011

Close the DOOR!–An Addendem:

9/1/2011 – 
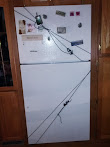
CAUTION:  The system for securing the refrigerator doors that I described below, has some flaws.  The main one is that these bungee cords gradually lose their tauntness and strength and after a few months of use, won’t keep a raw egg from pushing the door open from the inside. I am temporarily using a ratcheting binding strap on these same hook points, to keep the doors closed after a watermelon forced it open in route.  Yummmm.  I had forgotten how good a dropped watermelon can taste in the summer. Much

better than when you just cut one open.  


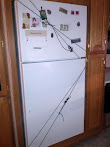
We swapped out the Norcold 1200LRIM RV refrigerator with a 2 door residential refrigerator back in January 2011.  The refer we used was our beer and watermelon fridge in the basement of the stix ‘n brix. We figured that it would be a free way to try it out and see if a residential would work for us ok. So far, it has and then some!

How it works
How it works

However, a residential refrigerator does not have positive catches to hold the door closed and we found very quickly that the magnetic seals are not strong enough to keep the doors closed in transit.

At first, we just propped the table against the door but that did not do so well, either, so I finally put my mind to it, thought of many Rube Goldberg technologies to hold the doors closed in transit, and finally came up with this:

I am not certain exactly where I got these clamps. I suspect they were at Home Depot and might have been clamps for holding the tubing for an icemaker water line.

2011-07-30 23.31.55.jpg
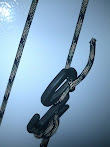
Eyes for hooks, up close.
2011-07-30 23.42.05.jpg
Being offset like this let me turn them so they don’t stick out forward and catch on sleeves and such as we put and take things in the fridge. I just used the existing screws that were already there for mounting the middle door hinge bracket. The doors were swapped to be left handed and the hinge was moved to the other side.
Freezer hinge
Freezer hinge

The bungees came in a pack from WalMart.  They are flat rather than round and the hooks are rigid plastic over steel and not just rubber dipped so they don’t catch on everything or scratch.

The hinge end just hooks over the top or bottom hinge of the door

In time, I may resort to something more technically sophisticated but this was really quick and easy to do for the time being.

ttfn

Budd

Thursday, June 23, 2011

Making the Outside Shine

Our 1999 King of the Road has the usual fiberglass skin and molded fiberglass end caps with an EPDM rubber roof.  Over the past 7 years I have tried to keep it looking newer and a big part of that is how “fresh” the surfaces appear.   I have worked with waxes, silicone products, various cleaners, scrubbers and pressure washers and nothing seems to last for long. 

These two photos (before/after)  show how much improvement just 3 coats of Red Max Pro have made.


In fact, few things have made it look even pretty good.  The rest gave only various grades of clean with little or no shine at all. Granted, we live in the mildew belt of North Carolina and that makes any active cleaning work under hourly challenge.  But honestly, nothing has been able to give it a new look, again. PoliGlow has a reputation of being a great solution for boats and RVs and the testimonials of those that have used it are broad and strong... but with caveats.

PoliGlow is pretty pricey, too, when one has a 40' anything and there is significant manual labor involved. There is also some risk that if the conditions are marginal or the instructions are not closely followed, the results can be disappointing at best. Despite the testimonials, my middle name is Murphy and I know that if anything can go wrong, it will, if I have anything to do with it.  So, PoliGlow has been on a back burner for a few years as an elective if I ever feel lucky.

But recently, I discovered in an Escapees Forum thread, which referenced folks successfully using a floor product called Red Max Pro #3.  Their claims are that it is just like PoliGlow but only about $15/Gallon!  That I am willing to risk some $$$ and personal elbow grease to test so yesterday, I bought a gallon along with a can of Barkeepers friend and some Magic Erasers to round out the kit. A lot of discussion about it, how to use it and results are in the "Check This out NOT Poliglow... " thread on the FiberglassRV.com forums.

Most of the  people that have used Red Max Pro #3 have chosen to prep the surfaces with the Barkeepers Friend powder and use the 3M ScotchBrite pads to do heavy scrubbing.  These pads do come in several grades of aggression but I found many years ago that the green ones will scratch window glass so have shied away from using them on any polished or sealed surfaces.  Magic Erasers, on the other hand, are made from fibrous materials like Masonite and I have not seen any evidence that they scratch hard glossy surfaces.  They do seem to work quite well with some cleansers, like Simple Green, to help remove a lot of things from fiberglass, rubber gaskets and vinyl trim strips.

So, I am ready to get it clean and shiny... just as soon as I feel like it.  Here is an album of my progress:
 

ttfn

Budd

The Remote Control Corral


In a house, managing all the remotes for TV, Cable box, Satellite dish, DVD/VCR players, etc. is a real bother.  In an RV, it is downright aggravating because of very limited table top spaces and the packup/unpack rituals that surround each move. 
 
I know that there are multi-device remotes available and I have a few but they all fail, in one way or another, to completely control all units and their features like I want.  Thus, I am constantly trying to round up this heard wild controls to find the one I need right now.
 
I have successfully used Velcro for mounting controllers for years and just needed to get focused on a more complete solution that will hold up through use and moves and keep all of them handy but out of the way.


At present, I am using the CLEAR 3/4" Velcro tape and have found that it is almost invisible on the our wallpaper when a remote is not on it.  The “Sticky Back” version has thinner pads so it holds things closer to the surface and that is a help on a vertical surface, like a wall.
 
With a little work, most of the controllers can be positioned so that they operate their units without having to be removed from the wall and that is even better than having to find the one you need after a move.
 
It is a work in progress so this is currently in the "try this" prototyping stage but so far, I am very pleased.  At some point, there may be some rearrangement for convenience and I am thinking of a few patches on the bookcase between our chairs but Mer never uses a remote, anyway, so that may not be a pressing matter.
 
ttfn
Budd